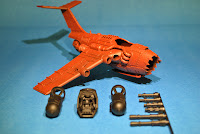
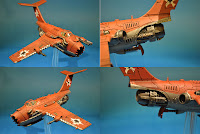
Welcome to part two of my Ork Fighta Bommer article. My Ork force mostly consists of Evil Sunz, so i decided to go with red. Besides, everyone knows the red ones go faster. if you would like to see the build click here.

I started the whole painting process by washing the parts in a very light solution of water and dish soap. make sure you completely dry the parts before the next stage. I mounted the smaller parts on a 'stick' of plastic (you could just use spare sprue). This allows me to get an even coat of the chaos black primer I always use.
 After the parts were primed in black and allowed to dry ( I recommend about 2 hours), I applied a coat of Tamiya dull red spray paint. Tamiya paints are an excellent base paint. although, they are stinky so you need to do this outside or in a well ventilated area. I allowed this coat to dry for another 2 hours.
 In this stage I used the same Nissan silver I used on my Necrons. this paint only needs about 10 minutes to dry completely.
The final stage was to test fit all my parts and sand any spots that are to tight due to paint buildup.
 The cockpit
I had pre-assembled the cockpit so I didn't need to paint the parts you cant see once the canopy is attached. I started with the console and seat back, these I painted with Vallejo duck egg green (009). the duck egg replicates the green found in some Russian aircraft, then I painted the pilot ork skin areas with Gretchen green foundation base. I painted the fur on his flight suit with astonomican grey and black mix. next I painted all the silver areas with boltgun. now I washed the duck egg parts with a mix of thrakka green wash and technical medium (to thin the green so it didn't over power the duck egg). then a heavy wash of thrakka was placed over the Gretchen green, and badab black wash over the grey areas. I finished with paint pens on the instrument panel and some blue wash in the dials, I then painted the teeth with dark brown I mixed up and then worked it up to bleached bone. I painted the eyes with orange and a yellow highlight. The final stage was to add some camo green to the raised areas of the ork flesh and a quick dry brush on the nose and ears with a mixed red and pink. I find this last stage gives a bit of life to the green skin.
 The decals and details
For the 'star' areas I broke out the old airbrush, but this could be done with a brush just as easy. First I made a mask for the star shape out of green tape then I sprayed white on the first pass. the second pass I rotated the mask to make I look like it was done and then repainted at a later date. then I placed all my decals from the sheet I wanted to use. I then set the decals with solvaset, dont be to hasty let the solvaset do its job. once they were all seated to the model and completely dry, I sprayed the whole kit (minus cockpit) with testors dullecoat. this last stage removes any shininess the decals may have and makes the carrier film of the decal disappear.
 All the metal gubbins
This stage I painted all the metal parts and 'paint chips'. for the exhaust and engine parts I only used three paints boltgun metal, black and Vallejo Tinny Tin. I first mixed the boltgun down with black to make a dark metallic. This colour was painted to the engine and some parts of the exhaust pipes. I accented the exhaust and engine with the tinny tin and then highlighted some sections with a silver paint pen.
At this stage the plane looks too Un-Orky, so used any other red I could find to paint some panels here and there to look like new parts or repainted areas. this stage gives ork vehicles nice character. like most of these techniques dont over do it or it looks silly. But then again it is Orky so go to it. At this stage I also did some dry brushing of orange and light red to some areas to make them 'pop'.
Conclusion
I really like this kit. It's fun to paint and fun to build. now with the new rulebook in my hand I'm going to add a few to my force. The new flier rules make them way more survivable. And this will make a nice Character piece for the force.
Well that's all for now. As per usual if you have any questions or comments dont be afraid to ask. Enjoy, and see you soon in the 4x8 arena.


No comments:
Post a Comment